New Fiber Toy!

loom delivered
Great looms come in small packages!

After spending most of the past year moving, with my loom and other fiber toys in storage much of that time, when I finally had everything unpacked and ready to use I couldn’t resist adding a new fiber toy when the Woolery had as sale on a small tapestry loom. It arrived right on time as soon as I was done showing my new townhouse to a series of out-of-town relatives. It took just an hour or so to put together, and I’ve just finished my first project!

cat helpertapestry complete!

Looping and Netting Workshops

I spent the weekend taking two workshops at the Spurlock Museum in Champaign, IL with Donna Kallner – “New Age Looping” and “Diamond-Mesh Netting in the Round”. I didn’t know anything about either craft, but Donna’s workshops were highly recommended and I was sure I would have a good time. I was also lucky enough to get a scholarship for the workshops from my fiber guild, the Champaign-Urbana Spinners and Weavers Guild.

I learned that looping is an ancient cloth-making technology done with short lengths of thread, yarn, or other material. The entire length of thread is pulled through a loop at the edge of the fabric and through itself to create a very stable stitch, so the resulting fabric won’t unravel if there are cuts or holes. Traditional looped fabrics were made by spinning a new short length of yarn onto the end when one length ran out, but we learned several methods to add more yarn. Donna had a wide variety of samples she had made ranging from functional bags to a lacy vest; we also got a close look at some looped items from the museums collection. I had fun playing with a variety of yarns as well as bark strips and taking the loops in random directions to see what kinds of effects I could get. I’m looking forward of looping some small pouches with some of my handspun yarn samples and working my way up both to trying the spin-as-you-go method and combining yarns and fibers in a larger more decorative piece.

Diamond-mesh netting dates back to Paleolithic times and is used to make traditional fishing nets; it is also good for mesh grocery bags. Donna had samples of bags in various shapes and we viewed a fishing net from the museum collection. In the workshop we each almost completed a bag to carry our water bottle. This technique uses longer lengths of yarn wound on a netting shuttle, using a gauge to keep the meshes even and tying a knot at each intersection. The work is done under tension, so it was quite an upper body workout to spend a day netting. I didn’t enjoy it as much as the looping, but I will be making more bags over the next month or two. It seems like a perfect project for my rather coarse homegrown linen yarn, and I want to be sure to really learn the basics while I let my imagination work on what I might do with it in the future.

My Flax Project

Books, seeds, flax strick, and yarn.

Last summer I finally learned to spin flax in a workshop with Patsy Zawistoski at Michigan Fiber Festival. This summer my husband Phil suggested taking my linen yarn making back to the beginning, by growing and processing our own flax. Over the winter I practiced spinning flax, ordered and read all the books I could track down, and found a source for seeds of Marilyn flax, a variety recommended for yarn production.

There will be some special challenges because we are apartment dwellers, but we rent a plot for vegetable gardening each summer at the Champaign Park District’s Eddie Albert Garden Plots. We never get the whole 20’x20′ plot planted, so this year we will use about a third of it for flax. Yesterday was the first day this spring that the soil was dry enough to work, as well as the last day before a predicted five days of rain, so we had a long day at the garden. After about five hours of spading, breaking clots by hand, and raking, a 9×12 area for flax and a 4×4 area for lettuce were ready. After that it didn’t take long to broadcast the flax seeds and plant lettuce and spinach, with just enough energy left to head for our neighborhood Mexican restaurant for dinner and margaritas.

Once the rainy spell is over, I hope to have a picture to post of a field of sprouted flax. Please check back often to follow my progress!

Web of Life Hat

hatIn the many months since I last posted I have been having plenty of fun with textiles, including lots of small knitting projects with my yarn that I’ve spun over the years.  My latest project I call the Web of Life Hat because it owes its origins to so many people.

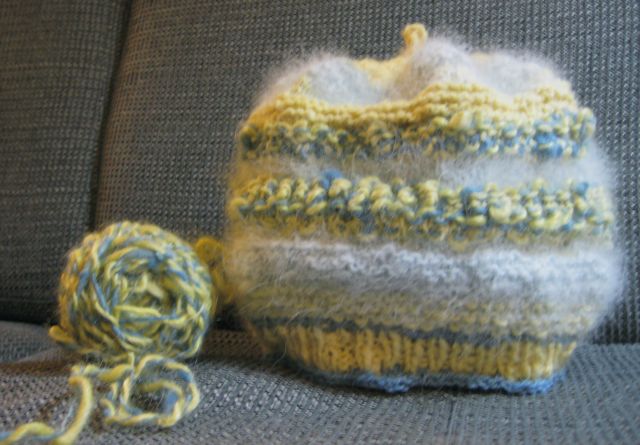
The design started with the yarn shown next to the hat in the photo – an exuberant bulky skein my friend Beth Engelbrecht-Wiggans made plying yarn she spun with yarn spun by her mother in law. Beth’s yarn is dyed with indigo and goldenrod, so I combined it with selections from my handspun that I had dyed with natural dyes, including indigo, weld, and carrot tops.

The pale blue fuzzy yarn embodies another chain of family and friendship.  It is the fur of a Great Pyrenees dog owned by someone I’ve never met.  Our link is through my mother in law’s college roommate, and now through the yarn and hat.

Once I started thinking of the chain of relationships that went into the hat I had to add all people who taught me about knitting, spinning, and dying, and our ancestors who domesticated dogs and sheep and invented ways of making their fur into yarn, adding color, and making clothing.


Handwoven lace among the sunflowers.

I have finished a shirt made with my handwoven lace fabrics – mostly huck, with basketweave blocks for the shoulders and bronson lace for the sleeves.  I used the rest of the basketweave to make a shawl for my mother, and have enough of the bronson left for a sleeveless top.  Then I’ll find time to get back to the loom.

This photo was taken in my vegetable garden, which has turned into a sunflower jungle since I couldn’t resist keeping all the volunteer sunflowers even when they overshadow my tomato plants.  My apartment has been full of cut sunflowers all summer.


Bronson off the loom!

I reached the end of the warp on my first Bronson lace Sunday, and the cloth has been through the washer and dryer twice. It is not very photogenic since it is badly in need of ironing at this point. Next week I’ll get to work designing my summer blouse with the Bronson, huck, and basketweave. It will be great to have something I can wear in hot weather to show off my weaving.

Warped again!

Continuing my lace weaving experiments, I now have my loom warped to give Bronson lace a try.  As usual there were a few glitches along the way.  I carefully counted heddles before I began.  For Bronson half the warp threads are on the first shaft, so it needs extra heddles.  I added plenty, but then got the shafts out of order when I put them on the loom.  I had threaded heddles and sleyed the reed about 2/3 of the way across when I saw that I was running out on the first shaft.

A learning opportunity!  I decided not to take the obvious path of undoing my work and starting over – thus learning to be more careful and doublecheck everything.  Instead I decided to work with what I had and come up with a threading that would make a viable cloth with the Bronson treadling, using shaft 1 every six threads, and using shaft 2, where the extra heddles ended up, more often than others.  I came up with this threading pattern: 1-2-3-4-2-3-1-2-3-4-2-4  I thought there might be long floats so I sett this section at 3 threads per dent, vs 2 threads for dent for the Bronson.

It is looking pretty good so far.  The invented pattern would make a good button placket if the Bronson is the front of a shirt, I think.  I’ll get a picture when I’m further along.

Hot off the Loom

This photo shows the texture of the fabric.

I finished the huck lace yardage Thursday and this morning Phil took some photos.  Now the yardage is in the washer and I am winding a warp for the Bronson lace to be combined with the huck and basketweave in a blouse.  I’m in suspense since I have read that lace weaves change quite a bit with wet finishing.

In this one you can see how lacy the fabric is, with light coming through.

Slow weaving

I have been making slow progress on the huck lace – a few pattern repeats a day – mainly because of being busy with other activities.  I was beginning to get a bit bored with it, possibly because it was progressing slowly or maybe because I was working on a section with blue warp and blue weft – not very exciting until I’m done and can see how it changes with washing.

I took an enforced break from weaving to wind more quills for weft – a bit of a project because the new kitchen counter doesn’t have a place to attach the quill winder, so I had to find another place and move quite a few books to use it.

Eventually I decided to spice things up by adding more colors – two shades of peach are what I have on hand in the same type and size of yarn.  I also varied the pattern by interspersing areas of blue plain weave with contrasting lace areas.  Just another yard to go, I think, and then I’ll wind a warp for bronson lace.

My yarn will be in a Museum!

For the past two years the Champaign Urbana Spinners and Weavers Guild has been working on an exhibit with the Spurlock Museum  in Urbana.  I chose an artifact from the museum collection – an auger shell scraper from the island of  Yap –  to inspire three skeins of yarn.  It was important to me that there be yarn on display – I knew other guild members would weave, knit, or felt.  I also collaborated with another member of the guild and spun yarn that she used for weft in a pair of shawls.

Above I'm wearing the shawl Pat and I made together for the exhibit.

At yesterday’s guild meeting, we showed our work to other members.  We also had individual interviews which the museum staff filmed to use in a video which will accompany the exhibit.

We will be delivering our artworks in late June so the museum staff will have about a year to design the layout, build cases, make labels, and do the publicity before the exhibit opens.  It has been an interesting experience to design yarn in this way and to learn about what is involved in putting together a museum exhibit.

Blending Colors